These are terms used to describe parts of outdoor structures. Most people are familiar with most of them. But if you aren't, please come here to see what something means when you see me write something unfamiliar on a Plan or in an email.
We need to avoid any miscommunications and referring to things on your project with the same terms will help us with that. Even if it's not the term someone else would use or that you saw in some How-to book, these are the terms we use and it will be important to understand them before you sign a contract with us.
You can also visit this Gallery (seen in our Main Gallery) to get a good visual and description of our main terms and accessories:

Definitions of
our Deck Terminology
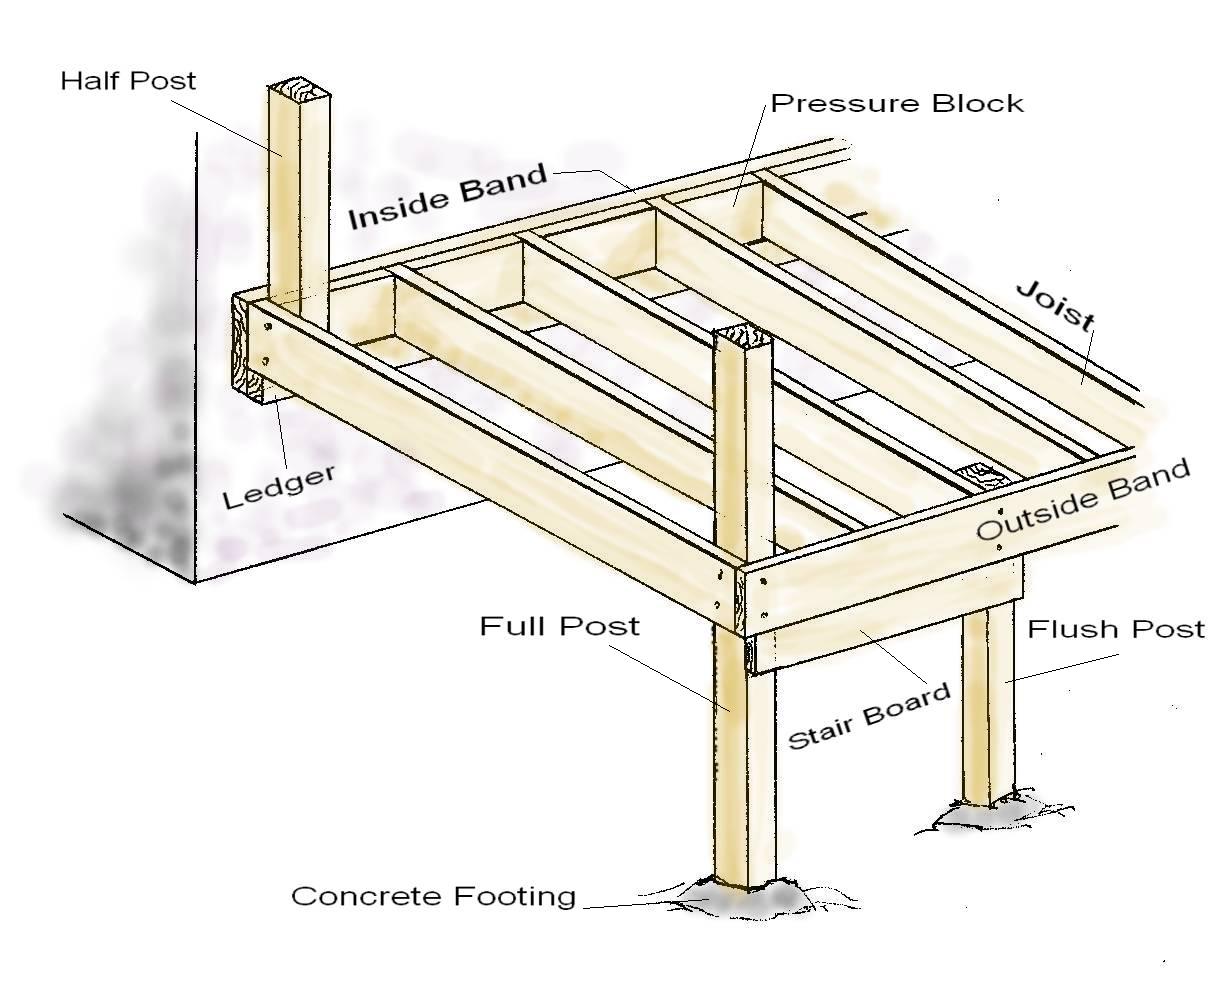
Below are terms not seen in the Definitions Gallery above. There is an image below the Definitions to help illustrate some of them:
► Band -
This is the 2x8, 2x10, or 2x12 that caps the joists, on edge, in a frame. The one against the house is called the Inside Band, and the one on the outside of the deck (at the opposite end of the joists) is called the Outside Band. Most guys call this a Ledger, but I learned from a real carpenter so we're sticking with "Band".
► Joists -
These are the 2x6's, 2x8's, 2x10's or 2x12's that are the framing members, on edge, that support the floor. They are typically 16" on center from each other. They are capped by the Bands and may have a Girder Beam helping support their span.
► Ledger -
This is a long 2x2 that attaches to the Inside Band and runs under the joists to give them a 2nd form of support at the house (besides Pressure Blocks and to avoid metal joist hangers). A Ledger is only used if the Inside Band is a larger board than the joists.
► Girder Beam (or Beam) -
These are 2x8's, 2x10's, or 2x12's, on edge, and are underneath the approx. mid-span of the joists (and perpendicular to the joists) to give them extra support. They are supported by Posts and they may be by themselves or double or tripled up for extra strength.
► Skeleton -
This is what we call it when we have a few frame boards up on temporary supports that make up the entire shape, or outline, of the deck. The inside and outside bands, the joists on either end, and a few joists in the middle to help it all hold its shape. It is the least amount of framing we can have on temporaries so that we can square the deck and find where to dig the post footings.
► Pressure Block -
These are blocks that fit between the joists and are nailed to the inside or outside band. They are the same width board as the joists and fit tightly between each joist. When nailed properly, these lock in the joists and keep them from leaning and are used intead of ugly metal joist hangers.
► Post -
A post is a 4x4 or a 6x6 that is installed vertically to support the frame or to support the railing. There will never be a "post" smaller than a 4x4. Never confuse posts with other vertical members such as balusters. Posts can also be metal or composite. Posts that support a roof or that are wrapped with other boards and trim can also be called Columns.
► Full Post -
A Full Post is one that comes out of the footing in the ground, goes up through the deck frame, and continues up to support the railing. Full posts are secured at 3 separate spots (footing, frame, rail) and that helps keep them from twisting or bowing.
► Flush Post -
A Flush Post is one that comes out of the footing in the ground and stops at the top of the deck frame. It does NOT continue up for railing, but it is fully in the frame so that it can be secured with two bolts.
► Half Post -
A Half Post is one that is bolted into the deck frame and goes up for railing. It does NOT go lower than the frame or the Stair Board and does NOT go down to the ground or footing. Since it is not secured in the footing, Half Posts need to be secured with additional blocking in the frame to keep the railing from having any movement.
► Stair Board -
A Stair Board is usually a 2x8 bolted, just under the deck frame, to the posts on either side of the staircase. This board gives the 2x12 Stair Stringers something to attach to and allows the stairs to start one step down from the deck as all stairs should.
► Stair Stringers -
Stair Stringers are the 2x12's that have the triangles cut out of them for each step and are propped up at an angle against the deck, or that go between landings, to support the Stair Treads.
► Stair Treads -
The flat boards on each step that you put your feet on. Each step will have at least two 5½" wide deck boards, but could have 2½ or 3 deck boards for a more comfortable depth step.
► Stair Risers -
These boards are on edge, vertically on the back of each step. Some call them Kick Boards. They prevent you from seeing through the stairs between each step and give things a finished look. Some stair cases that are high in the air or go to the 2nd or 3rd story of your deck may not have Riser boards because it can make it all look too bulky in that situation. But it all just depends on the rest of the design of the deck.
► Footing -
These are the supports for the entire deck structure. For a house the footing is usually a long continuous ditch full of rebar & concrete to support the block foundation. But for a deck a footing is usually a hole dug below the frost line to a depth of solid ground. And we pack a flat block or rock in the bottom of the hole, set our wood post on that, then mix concrete to fill the hole around our post. If we are doing Solid Skirting around the deck we will make the concrete fairly flat with the ground. Otherwise we will mound the concrete up very slightly so that it looks nice & sheds water away from the post.
► Handrail (or Rail) -
A Rail is a system of other individual parts (posts, stringers, balusters, and maybe a top cap). Together they create a barrier to prevent someone from falling off a deck or stairs. There are many styles of railing. All of our base quotes include Our Standard Railing and if another style or material is wanted, you will have to specify in writing with the correct terms so there is no miscommunication. So please don't refer to the railing as "the perimeter" of the deck because that could be SO many other things!
► Top Cap -
On a wood railing this is the flat board on the very top that runs the length of the railing. It can run over the tops of the rail posts, or the posts can stick up through the Top Cap for various reasons. Ours is always a 2x6, but substandard contractors will use a piece of 1" decking.
► Baluster (or spindle) -
These are the skinny vertical members that are attached between the top & bottom Rail Stringers and are usually about 5" apart on center and fill a rail system in between posts. These can be called rail pickets (if they are wood), but they are never called Posts. Balusters are not posts.
► Rail Stringer -
These are the top and bottom 2x4's that run, on edge, horizontally between or across the rail posts. They support the Top Cap and the Balusters.
► Picket -
Pickets are usually the wide flat boards that are attached vertically on a wood fence. We use them, vertically, for our Solid Skirting and we sometimes rip them to use for trim on various things. We have, at times, called our wood 2x2 railing balusters "pickets."
► Picture Frame (or Border Board) -
Normally only done on a composite deck, these are the floor boards that create a border or picture frame around the entire rest of the floor on a deck. It follows the shape or outline of the deck and is a board that has solid edges so that it can hide the grooved edges of all the other floor boards.
► Divider Board (or Breaker Board) -
Done a lot on composite decks, and increasingly more often on wood decks, this is a flat floor board that divides different sections of the deck floor. Sometimes creating sections looks better than splicing all of the floor. The Divider can be one, two or more boards depending on the design. There does not have to be a Border Board in order to have Divider Boards.
► Fascia -
This is a thin and wide board that is used to cover the deck frame (if the deck is composite). It also refers to the outermost thin board on the eave of a house roof. Any instance where some perimeter part of a structure needs to be covered to look better is usually called "Fascia."
► Column Wraps -
When you want to cover posts or columns, it is called "wrapping it". And this is done with 4 thinner boards that are installed vertically to hide the original post or column. Many times there will also be a Cap & Base trim installed when doing Column Wraps.
► Hidden Fasteners -
These are fasteners that are used to hold deck flooring down that normally install in grooves on the sides of each piece of flooring so you can avoid nailing or screwing the boards through their face. You can still see them if you look between the floor boards, but it's a much better look than screwing the boards down. However..... sometimes it can be nearly impossible to remove & replace just one floor board from the middle of a deck with Hidden Fasteners.
► Gable Roof -
This is the kind of roof that is vaulted, or higher, in the center. It has a right slope and a left slope over the deck or patio like this one.
► Shed Roof (or Slope Roof) -
This roof just slopes one direction - usually from the highest point at the house to the lowest point over the outside edge of the deck like this one.
► Hip Roof -
A Hip Roof has either 3 or 4 slopes. If it's attached to a house it will have 3 slopes (right, left, and front) and the entire overhang will be the same height (no big open triangle like on the front of a Gable). If it has 4 slopes then it is either over an entire section of house, or it is a free-standing roof like a Pavilion - like this.
► Rafter -
Rafters are the individual "ribs" of a roof. Like the joists of a deck, but instead of being level, they are on the slope of the roof. There are several different kinds of rafters, but instead of you having to know all of them, just know that mostly anything that looks like a "rib" when you look up at a roof is probably a rafter of some kind.
► Ridge -
This is actually the "spine" of a Gable or Hip Roof. It is the board, on edge, that is level and the main rafters come up to it. This is the board where your ceiling fan may hang from if we are doing an open-rafter (no internal ceiling) style roof.
► Open-Rafter style roof -
This can be seen in most of our roof pictures. Whether the Roof is Gable, Hip, or Slope, if you can see all the rafters and the plywood decking on top of them then it is an Open-Rafter style. If we install a ceiling, either directly to the bottoms of the rafters no matter which style, or on level ceiling joists so the ceiling is flat, then it's NOT Open-Rafter style.
► Overhang -
This is how much your roof hangs over the exterior wall of the house or how much it hangs over the roof beam on our deck. 16" is pretty typical but many house roofs can have an overhang of 24" or more. We try to match what the house has when we do a deck roof, but sometimes we have no choice but to stick to 16" or 18" on our deck roof Overhang. And this is where the rain will drip off onto your deck or yard and where you might want a gutter installed.
► Square -
This is where two walls of your house, or the house and side of the deck, will be 90° to each other. Or if you have a deck that is a square or rectangle (or Pavilion) then when you measure from corner to corner, diagonally, you will get the exact same measurement if it is square. No matter what shape the deck is, it still needs to be built square. Or anything you have built for that matter - shed, porch, patio - it all needs to be built square! For more on understanding how to find square and the importance of it, I could not do any better than this article on decks.com.
Please let me know if you are unclear on any term you see here or somewhere else !